Monday, April 27, 2015

GLUTEN FREE CHOCOLATE BOTTOM BANANA BARS with DIARY FREE INSTRUCTIONS

Posted by Bryna Bear aka Gluten Free Baking Bear

     All of my bananas got very ripe at once.  This called for banana baking.  Wanting to try something new, I did a Google image search for “banana desserts”.  This recipe caught my eye.  It was a wheat recipe from Taste of Home’s website that I converted into a gluten free version.  The cake is made in two layers using just one banana batter; the bottom layer has chocolate added and the top is plain banana.  The cake is nice and moist.  You can taste both the banana and chocolate flavors which are delicious together.  This recipe is a keeper.  
     The recipe is easy, but spreading the batter in the pan takes a little patience. I made the dairy free version with oil and applesauce in place of the butter.  It was quite good.  If you can eat butter, please use it.  For me, nothing compares with the taste and richness of butter in any recipe.


GLUTEN FREE CHOCOLATE BOTTOM BANANA BARS
Makes one 9 X 13 cake.  24 bars.

Ingredients
1 cup
Sorghum Flour
1/4 cup
Tapioca Flour
1/4 cup
Chickpea Flour
1 1/2 tsp.
Baking Powder
1 1/2 tsp.
Baking Soda
1/2 tsp.
Sea Salt
3/4 tsp.
Xanthan Gum
1/2 cup/1 stick
Unsalted Butter
For Dairy Free use 1/2 cup Canola Oil or 1/4 cup of oil & 1/4 cup of applesauce. 
1/2 cup
Sugar (I use evaporated cane juice crystals)
1 large
Egg
1 tsp.
Vanilla
3 medium/1½ cups
Bananas - mashed
1/4 cup
Cocoa Powder
1 cup
Chocolate Chips
For Dairy Free use Dairy Free chips.

Directions
  1. Preheat oven to 350℉.  Grease a 9 x 13 pan with butter or margarine.
    Greased 9 X 13 pan.
  2. In a medium bowl add the flours, baking soda, baking powder, salt & xanthan gum and mix together well with a whisk.  Set aside.
    Dry ingredients whisked together.
  3. In the bowl of a stand mixer or in a large bowl, cream together the butter and sugar.  If using oil and or applesauce instead of butter skip to the next step.
    Butter and sugar in the bowl of a stand mixer.

    Butter and sugar creamed together.
  4. Add the egg, vanilla and mashed bananas and mix well.  If using oil and or applesauce mix in together with the egg, vanilla and bananas.
    Egg, bananas & vanilla added to the creamed butter.

    After the eggs and banana are mixed in.
  5. All at once, add the flour mixture and mix until well blended.
    Batter well blended.
  6. Take about half of the batter and place in a separate bowl.  Add the 1/4 cup of cocoa and mix in well.
    Cocoa added to half of the batter.
  7. Spread the chocolate batter evenly over the bottom of the pan.
    Chocolate batter spread over the bottom of the pan.
  8. Spread the other batter over the top of the chocolate batter as evenly as possible.
    Spreading the rest of the batter over the top of the chocolate batter.

    Plain banana batter all spread over the chocolate batter.
  9. Sprinkle the chocolate chips over the top of the cake.
    Chocolate chips sprinkled over the top.
  10. Bake for 30 minutes or until the cake springs back when pressed lightly with a finger or when a toothpick or cake tester comes out clean.  Turn the cake pan half way through the baking time.  You may need to place foil over the top for the last half of the baking time if the cake is getting too brown.
    Cake after baked.
  11. Allow the cake to cool in the pan before cutting into squares. You can freeze leftovers (if there are any).

Tuesday, April 21, 2015

THE WORLD’S BEST GLUTEN FREE SWEET NOODLE KUGEL

Posted by Bryna Bear aka Gluten Free Baking Bear

     Noodle kugel is a typical Eastern European Jewish noodle pudding.  Everyone has their own recipe and ideas of when and how to eat it.  Some like it hot, some cold, some at room temperature.  Some eat it with the main meal, some for dessert, some with breakfast (like a breakfast pastry), some for a snack.  There are sweet and savory noodle kugel recipes.  There are also other types of kugel such as potato, cabbage, carrot, etc.  I always loved the sweet dairy noodle kugels best.  I will eat it at any temperature and at any meal or time of day; it is that good! 
     This recipe is made with lots of dairy and eggs.  It is the best kugel I have ever eaten, even better than my Grandma’s (sorry Grandma).  I converted a recipe from Tori Avery’s blog into a gluten free version.  
     To make this the very best kugel, you must use the very best ingredients.  For a gluten free noodle recipe the brand of noodle is key.  Usually, in the wheat world, egg noodles are used in this recipe.  I have tried GF egg noodles that were store bought, but they were so inedible that I threw them in the trash.  I can’t imagine they get any repeat customers with such an awful product.  The taste and texture were similar to a lumpy paste made from ground up cardboard, total yuck!  So instead of GF egg noodles I use my favorite brand of pasta, Tinkyada Pasta Joy.  All their noodles taste great and have an outstanding texture.  No one would ever know they were GF noodles.  They are rice noodles and come in brown or white rice and organic or non-organic varieties. There are many shapes and even lasagna noodles.  The company is Canadian.  It is a bit more expensive than other GF pastas, but well worth it.  For this recipe I used the fettuccini shaped Tinkyada noodles and broke them into thirds to be more the size of egg noodles than spaghetti. 
     Since I don’t make it often, I decided to use the more expensive brands of dairy ingredients to have absolutely the very best kugel experience.  I used Organic Valley brand cream cheese (full fat), butter & cottage cheese (low fat) and Green Valley sour cream.  I love Organic Valley products, the taste is wonderful, like what dairy products tasted like in days of yore.  Very flavorful and delicious.  Green Valley is a newer company that makes lactose free sour cream.  I don’t need the lactose free, but I need this brand of sour cream.  I got a sample taste at a GF expo last September and was hooked.  I have never tasted such an amazing sour cream.  The flavor is so delightful that you can eat it plain like yogurt.  I was never a big sour cream fan, but I am a fan of this brand.   
     Kugel is a fairly easy recipe to make.  You mix all the ingredients, except the noodles, together.  You cook the noodles.  Then you mix the noodles and all the other ingredients together, put it in a pan and bake it for 45 minutes - 1 hour.  You do need to let it rest about 20-30 minutes after baking.  If it is taken out of the pan right away the kugel will spread out and not stay together in neatly cut squares.


GF SWEET NOODLE KUGEL

Ingredients
1lb./1 package
GF Fettuccini Noodles - Tinkyada Pasta Joy brand is best.
Break the noodles into thirds to be more the size of egg noodles.
8 oz.
Cream Cheese
1lb./2 cups
Sour Cream
8 oz./1 cup
Cottage Cheese
6 large
Eggs
3/4 cup
Sugar (I used evaporated cane juice crystals)
1/4 cup/2oz./4 Tbs.
Unsalted Butter - melted
1/4 tsp.
Himalayan Sea Salt.
1 cup
Raisins
For Dusting
Cinnamon and Sugar

Directions
  1. Preheat the oven to 350℉.  Grease a 9x13 baking dish or pan with butter. 
    Greased 9x13 pan.
  2. Fill a large pasta pot with water, add some salt & a tablespoon of oil (to keep the noodles from sticking together) and bring to a boil.
  3. While the water is boiling add all the ingredients, except the raisins and noodles, to a large bowl and mix together well.  A few lumps are OK.  Some people put it all into a food processor and puree it, but I prefer the rustic texture with some lumps of cream cheese and cottage cheese that, when baked, become small clumps of “cheese Danish” sort of filling.
    Ingredients mixed together by hand.
    Note some lumps of cream cheese and cottage cheese.
  4. Add the raisins to the dairy and egg mixture and mix well.
  5. When the water boils, add the noodles that have been broken into thirds.  Cook the noodles about 5 minutes less than the package calls for.  Check the texture.  You want the noodles al dente.  Firm, with a little chew, but not crunchy in the center.  If the pasta center is still crunchy cook another minute and check again.  Repeat until the noodles are done.  It is better if the noodles are a bit under done than over done because they will continue cooking while the kugel is baking and you don’t want mushy noodles.  Drain and rinse with cold water to stop the cooking.
    Breaking the fettuccini noodles into thirds.

    Boiling the noodles in water with salt and oil.

    Drained noodles, after rinsing with cold water.
  6. Add the cooked noodles to the rest of the ingredients and mix in.
    Noodles added to the other ingredients.

    Noodles and other ingredients all mixed together.
  7. Pour into the prepared pan.
    Raw kugel in pan.
  8. Sprinkle the top with cinnamon and, if desired, a little sugar.
    Cinnamon and a little sugar sprinkled on top of the raw kugel.
  9. Bake about 45 minutes - 1 hour.  The kugel is done when the center is firm and the edges are puffed up and nicely browned.  Turn the kugel half way through the baking time so that it will bake more evenly.  If the top of the kugel is getting too browned at the half way point, then cover it loosely with foil to prevent further browning or burning.
    Kugel all baked. 
  10. Allow the kugel to rest for 20-30 minutes before slicing and serving.  If you cut it right away the noodles will spread out instead of staying in neat pieces when cut.

Wednesday, April 15, 2015

GLUTEN FREE VEGAN CHEESE BLINTZES with DAIRY FREE instructions.

Posted by Bryna Bear aka Gluten Free Baking Bear

    After creating my recipe for GF Cheese Blintzes I made a dairy free version for some friends.  I had been meaning to post the dairy free filling ingredients, but had been waiting to be able to add a vegan crepe recipe as well.  Well, I finally did it.  A vegan crepe with a vegan filling that tastes as good as a ‘real’ cheese blintz. OK, it is not the same and would not be mistaken for a dairy full one, but it tastes really really good.
     I converted a vegan crepe recipe into a gluten free one.  The filling recipe I created from scratch using tofu and dairy free cream cheese.
     The vegan crepes are a bit more difficult to make than the ones with egg.  It is important to cook the first side really well before attempting to turn it over.  The batter is very gummy if it is undercooked. I tried to turn the first one too soon and it clumped together into a gooey glob.  It took 1½ - 2 minutes for each side.  I ended up turning the heat down so the crepes would not brown so much while cooking.  The texture of the cooked vegan crepe is just right for blintzes. 
     No gums were needed for the crepe or the filling.  They held together fine without binders or egg replacers.  These blintzes can be frozen and heated up later to use as desired.  
   
GLUTEN FREE VEGAN CHEESE BLINTZES
Makes 12

CREPES
Ingredients
1 1/4 cups/150 gm
Tapioca Flour
1/2 cup/70 gm
White Rice Flour (superfine grind) 
1/4 cup/32 gm
Sorghum Flour
1/4 cup
Sugar
1/4 tsp.
Himalayan Sea Salt
1 cup
Water
1 cup
Non Dairy Milk of choice - I used almond

Directions
  1. In a large bowl add the flours, sugar & salt and mix well.
  2. Add the water and non dairy milk and whisk together until the batter is smooth and lump free.
  3. Allow to rest for 1 hour. (This is a good time to make the filling)
  4. When ready to cook the crepes, heat a crepe pan using a low/medium heat.
  5. Use vegan margarine to grease the pan.
  6. Pour 1/4 cup of the batter onto the pan while tilting and turning the pan to spread the batter all over the bottom.  If there are holes use a spoon to drop and spread some batter to patch the holes.
  7. Cook the crepe 1 1/2 - 2 minutes until the top is dry and the bottom is a bit firm.
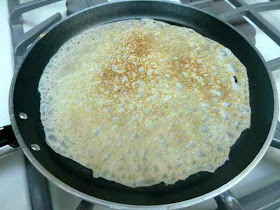
    Vegan crepe cooking.
     
  8. Flip the crepe over and cook on the other side another 1 1/2 - 2 minutes.
    Flipping the crepe with wooden tongs.

    Cooking the second side of the crepe.
    I lowered the heat for the rest of the crepes
    so that they would not brown so much.
  9. Place the cooked crepe on a plate.  Pile the cooked crepes between pieces of plastic wrap.

DAIRY FREE CREPES
Dairy Free egg crepes with tofu filling.
If you can eat eggs I recommend that you use the crepe recipe on my blog that I used for regular blintzes.  They are easier to cook.

FILLING
Ingredients
1 lb.
Extra Firm Tofu - pressed and drained
1/4 cup/4 oz.
Non Dairy Cream Cheese
1/4 cup
Sugar
2 tsp.
Pure Vanilla Extract 
1/4 tsp.
Himalayan Sea Salt

Directions
1) Press the excess water out of the tofu by putting the block of tofu between two flat plates.  Then put something heavy on the top plate to help to press out the water.  I use canned foods.  Every 10 minutes or so pour off the excess water.
Undrained tofu on a flat plate.

Undrained tofu on flat plat with second plate on top.

Using a can of tomatoes as a weight on top
of the plate to help press the water out of the tofu.

Tofu after pressing and draining the excess water out.

2) Add the pressed and drained tofu to a large bowl and mash with a fork or potato masher until there are no lumps.
The rest of the ingredients in a bowl.

Drained and pressed tofu added to the bowl with the other ingredients.

All the ingredients mashed together until lump free.
I used a potato masher, it works fast and easily.

3) Add the rest of the ingredients and stir together with a spoon until well combined.


ASSEMBLE THE BLINTZES
  1. Place 2 tablespoons of filling on the bottom third of one crepe.  I prefer to have the crepe’s side that was cooked last facing up.
    Crepe with 2 Tbs. of filling on the bottom third.
  2. Fold up the crepe to encapsulate the filling.
    The bottom of the crepe folded up to encapsulate the filling.
  3. Fold one side of the crepe, then the other.
    Folding one side of the crepe.

    The second side of the crepe folded.
  4. Roll up the cheese encapsulated part until you have a small egg roll or burrito shaped tube.
    Rolling up the crepe in to a 'burrito'.
  5. Repeat with the remaining crepes.
    The crepe rolled up into a blintz.

    The bottom of the blintz.
    Note the seam.
    This side gets cooked first when heating the blintzes.

COOKING THE ASSEMBLED BLINTZES

  1. Heat a pan over low - medium heat and melt some vegan margarine in it.
  2. Heat the crepes, a few at a time, seam side down, in the pan.  The crepe should be lightly browned on that side.
    Heating and browning the blintz seam side down first.
  3. Turn the crepe over and lightly brown the second side.  The blintzes should be lightly browned on both sides and heated in the center when done.
    A browned and heated blintz.
  4. Serve with dairy free sour cream, or yogurt and fruit preserves.  Some people like them with maple syrup and ‘sour cream’.  Some people like to use fresh fruit and other like them plain.  Have them any way you like.
  5. You should cook and eat the assembled blintzes within 3 days (keeping them in the fridge).  
  6. Freeze them, wrapped well, for longer storage.  Thaw, then heat and brown them up in a pan when ready to eat the blintzes.